.svg)
You'll be able to send an email through the Connect tab on the Emails Campaigns page.
First click the button "Create Campaign" to be directed to the Email Editor.
Our system automatically breaks sending One Off Emails into four different steps for convenience.

Step 1: Compose your email
You can choose to select a previous draft or you can start typing a new email.
Pick an engaging subject for your customers.
Most email providers have built in spam filters that look at the subject of an email to determine if it could possibly be spam.
Make sure and carefully choose your subject including staying away from spam trigger words ("free", "guarantee", "no obligation" etc.), don't use all capital letters, or any exclamation points.
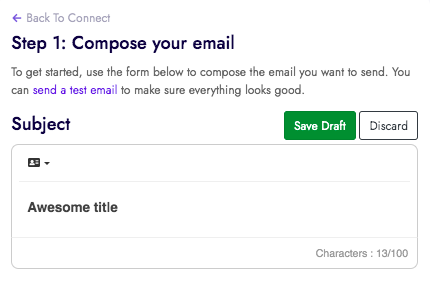
Personalize the subject by including the customer's name or other relevant information. To add a personalization click the "Insert Variables" button on the subject to see all of your options. When you insert a variable there will be an actual name as a placeholder, but know that we will customize this box with your customer's information.
Once you have the perfect subject you'll want to fill out the Body of the email. For the Body of the email we recommend that you add content in this order:
1) Type in the text of the message.
2) Insert any variables needed to personalize the text.
3) Add images.
Tip: We recommend that you add content in it's entirety before attempting to edit the format of the text. If you try formatting the message *as* you are typing and inserting images then you may run into some issues.
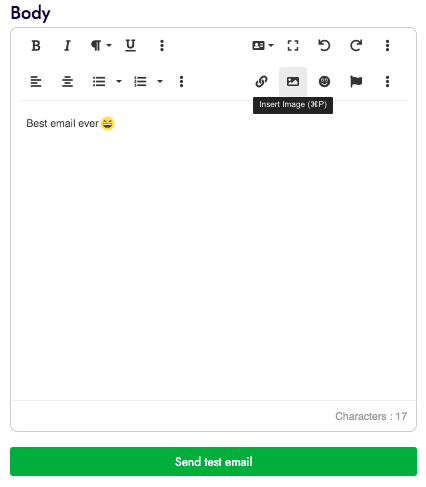
Once you have all of the correct information added and formatted you'll then be ready to see what the email looks like. Click to "Send test email" to see what the email will look like for your customers. You can edit/tweak any part of the email as many times as needed before moving on to Step 2.
Step 2: Choose your audience
Use the provided filters to narrow down your customer list for effective messaging. The two main filter options are customers who either have/have not purchased anything from you OR have/have not purchased a specific product.
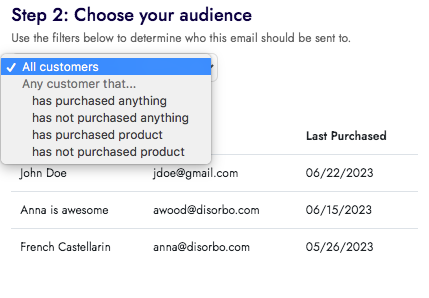
You can stack these filters to narrow down your audience even further. For example, if you have a batch of lip gloss you'd like to sell quickly you may choose to narrow down your audience to anyone who *has* purchased from you in the last 6 months and *have not* purchased lip gloss.

To add a new filter just select the plus icon and to delete a filter select the delete icon.
Note: The email will include only customers who match the filters when the email is created and not when the email is scheduled to send. Once you have your audience narrowed down you can then choose when to send your email.
Step 3: Choose when to send
We will automatically queue any One Off email ten minutes after you click to schedule the email. You can also choose the day and time that you would like your customers to receive the email.

If you choose a later date/time this will be when the emails are queued to send. The emails will not be delivered to your customer's inbox at that exact time. It can take anywhere from thirty minutes to a few hours to get all of the emails delivered properly depending on how many customers are receiving your message.
So, if you'd like to have a flash sale at 9am Monday morning you may choose to send an email to your customers before 9pm Sunday night to assure delivery before the sale.
Step 4: Send your email
You can choose to send a test email again or you can schedule your emails! Once you have scheduled your email then you cannot change or update any of the information associated with the email unless you Unschedule and Resend the email. This includes the list of customers that will receive the message.
Once you schedule your emails then you will be directed back to the One-Off tab on the email marketing page. Your email will appear under your Email History.
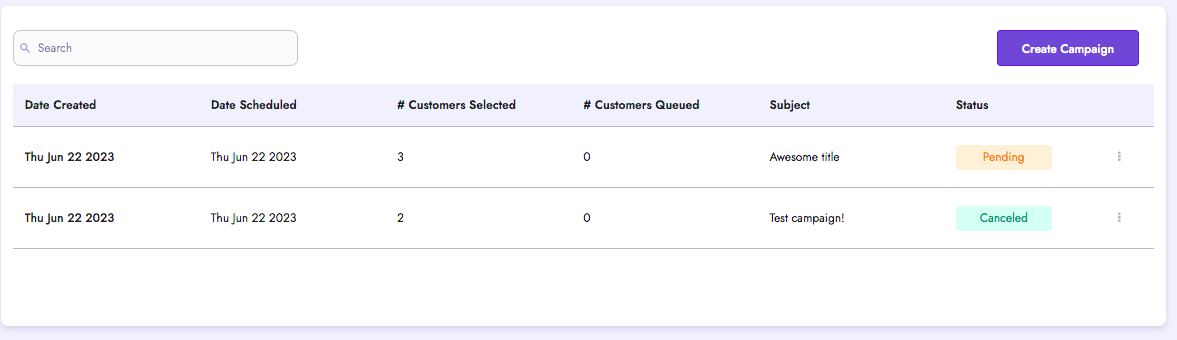
From this dashboard you can quickly and easily see when you created the email, when it is scheduled to send, and how many customers will be emailed. If you want to resend a previous message just click "Resend" beside the email. It will open the Email Editor will all of the previous information already filled in. You can edit the subject/body and choose to send to a different audience.
If you have a scheduled email and need to unscheduled the email select the yellow "Unscheduled" button beside the email. Once the email messages have been queued then this option will not be available.